Example mTLS policy
| Action | Rule type | Selector | Value |
|---|---|---|---|
| Service Auth | Include | Common Name | John Doe |
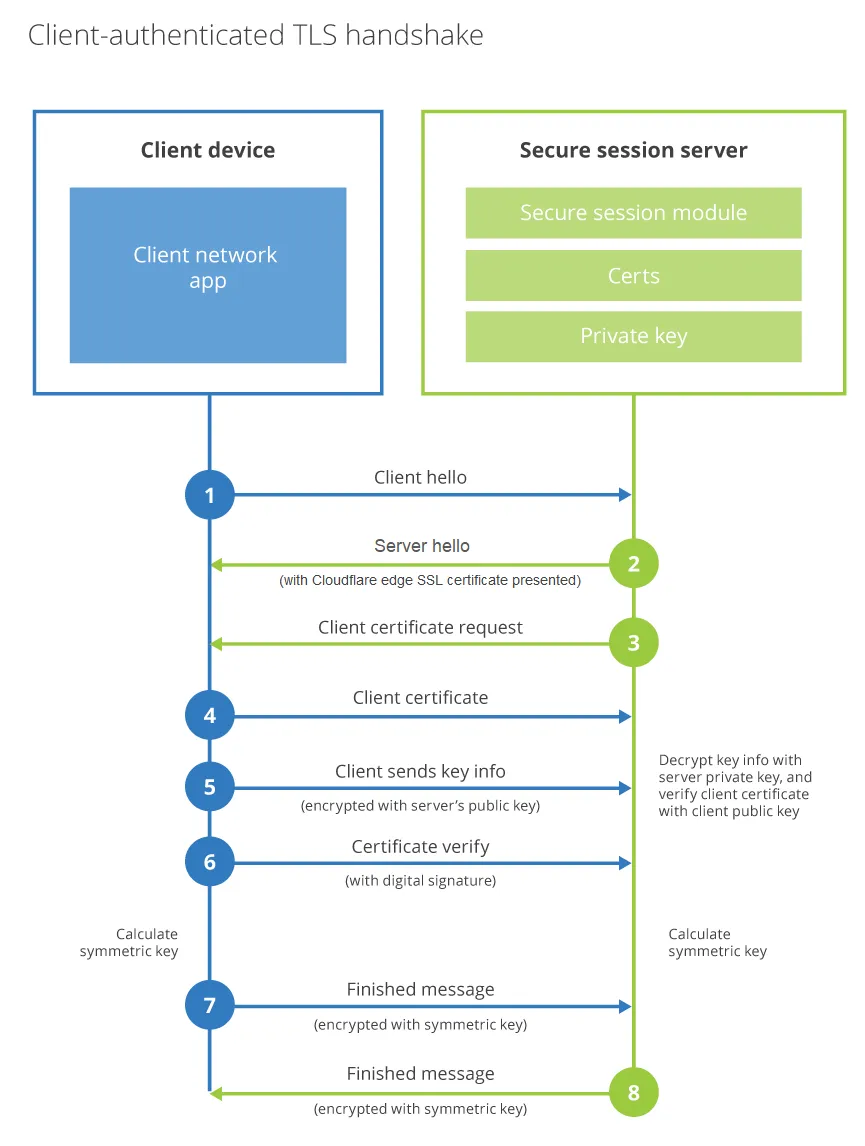
Mutual TLS (mTLS) authentication ↗ ensures that traffic is both secure and trusted in both directions between a client and server. It allows requests that do not log in with an identity provider (like IoT devices) to demonstrate that they can reach a given resource. Client certificate authentication is also a second layer of security for team members who both log in with an identity provider (IdP) and present a valid client certificate.
With a root certificate authority (CA) in place, Access only allows requests from devices with a corresponding client certificate. When a request reaches the application, Access responds with a request for the client to present a certificate. If the device fails to present the certificate, the request is not allowed to proceed. If the client does have a certificate, Access completes a key exchange to verify.
The CA certificate can be from a publicly trusted CA or self-signed.
In the certificate Basic Constraints, the attribute CA must be set to TRUE.
The certificate must use one of the signature algorithms listed below:
Allowed signature algorithms
x509.SHA1WithRSA
x509.SHA256WithRSA
x509.SHA384WithRSA
x509.SHA512WithRSA
x509.ECDSAWithSHA1
x509.ECDSAWithSHA256
x509.ECDSAWithSHA384
x509.ECDSAWithSHA512
In Zero Trust ↗, go to Access > Service auth > Mutual TLS.
Select Add mTLS Certificate.
Enter any name for the root CA.
In Certificate content, paste the contents of your root CA.
If the client certificate is directly signed by the root CA, you only need to upload the root. If the client certificate is signed by an intermediate certificate, you must upload the entire CA chain (intermediate and root). For example:
-----BEGIN CERTIFICATE-----<intermediate.pem>-----END CERTIFICATE----------BEGIN CERTIFICATE-----<rootCA.pem>-----END CERTIFICATE-----Do not include any SSL/TLS server certificates; Access only uses the CA chain to verify the connection between the user's device and Cloudflare.
In Associated hostnames, enter the fully-qualified domain names (FQDN) that will use this certificate.
These FQDNs will be the hostnames used for the resources being protected in the Access policy. You must associate the Root CA with the FQDN that the application being protected uses.
Save the policy.
Go to Access > Policies.
Create an Access policy using one of the following selectors:
If this is for a client who does not need to log in through an IdP, set the policy Action to Service Auth.
Example mTLS policy
| Action | Rule type | Selector | Value |
|---|---|---|---|
| Service Auth | Include | Common Name | John Doe |
Save the policy, then go to Access > Applications.
Select the application you would like to enforce mTLS on and select Configure. The application must be included in the Associated hostnames list from Step 5.
In the Policies tab, add your mTLS policy.
Save the application.
You can now authenticate to the application using a client certificate. For instructions on how to present a client certificate, refer to Test mTLS.
To test the application protected by an mTLS policy:
First, attempt to curl the site without a client certificate.
This curl command example is for the site example.com that has an Access application and policy set for https://auth.example.com:
curl -sv https://auth.example.comWithout a client certificate in the request, a 403 forbidden response displays and the site cannot be accessed.
Now, add your client certificate and key to the request:
curl -sv https://auth.example.com --cert example.pem --key key.pemWhen the authentication process completes successfully, a CF_Authorization Set-Cookie header returns in the response.
To access an mTLS-protected application in a browser, the client certificate must be imported into your browser's certificate manager. Instructions vary depending on the browser. Your browser may use the operating system's root store or its own internal trust store.
The following example demonstrates how to add a client certificate to the macOS system keychain:
client.pem file in Keychain Access. If prompted, enter your local password.Assuming your browser uses the macOS system store, you can now connect to the mTLS application through the browser.
You can use open source private key infrastructure (PKI) tools to generate certificates to test the mTLS feature in Cloudflare Access.
This section covers how to use OpenSSL ↗ to generate a root and intermediate certificate, and then issue client certificates that can authenticate against the CA chain.
Generate the root CA private key:
openssl genrsa -aes256 -out rootCA.key 4096When prompted, enter a password to use with rootCA.key.
Create a self-signed root certificate called rootCA.pem:
openssl req -x509 -new -nodes -key rootCA.key -sha256 -days 3650 -out rootCA.pemYou will be prompted to enter your private key password and fill in some optional fields. For testing purposes, you can leave the optional fields blank.
Generate the intermediate CA private key:
openssl genrsa -aes256 -out intermediate.key 4096When prompted, enter a password to use with intermediate.key.
Create a certificate signing request (CSR) for the intermediate certificate:
openssl req -new -sha256 -key intermediate.key -out intermediate.csrYou will be prompted to enter your private key password and fill in some optional fields. For testing purposes, you can leave the optional fields blank.
Create a CA Extension file called v3_intermediate_ca.ext. For example,
subjectKeyIdentifier = hashauthorityKeyIdentifier = keyid:always,issuerbasicConstraints = critical, CA:truekeyUsage = critical, cRLSign, keyCertSignMake sure that basicConstraints includes the CA:true property. This property allows the intermediate certificate to act as a CA and sign client certificates.
Sign the intermediate certificate with the root CA:
openssl x509 -req -in intermediate.csr -CA rootCA.pem -CAkey rootCA.key -CAcreateserial -out intermediate.pem -days 1825 -sha256 -extfile v3_intermediate_ca.extCombine the intermediate and root certificates into a single file:
cat intermediate.pem rootCA.pem > ca-chain.pemThe intermediate certificate should be at the top of the file, followed by its signing certificate.
Upload the contents of ca.pem to Cloudflare Access. For instructions, refer to Add mTLS to your Access application.
Generate a private key for the client:
openssl genrsa -out client.key 2048Create a CSR for the client certificate:
openssl req -new -key client.key -out client.csrYou will be prompted to fill in some optional fields. For testing purposes, you can set Common Name to something like John Doe.
Sign the client certificate with the intermediate certificate:
openssl x509 -req -in client.csr -CA intermediate.pem -CAkey intermediate.key -CAcreateserial -out client.pem -days 365 -sha256Validate the client certificate against the certificate chain:
openssl verify -CAfile ca-chain.pem client.pemclient.pem: OKYou can now use the client certificate (client.pem) and its key (client.key) to test mTLS.
This guide uses Cloudflare's PKI toolkit ↗ to generate a root CA and client certificates from JSON files.
The process requires two packages from Cloudflare's PKI toolkit:
cf-sslcfssljsonYou can install these packages from the Cloudflare SSL GitHub repository ↗. You will need a working installation of Go, version 1.12 or later. Alternatively, you can download the packages ↗ directly. Use the instructions under Installation to install the toolkit, and ensure that you install all of the utility programs in the toolkit.
Create a new directory to store the root CA.
Within that directory, create two new files:
CSR. Create a file named ca-csr.json and add the following JSON blob, then save the file.
{ "CN": "Access Testing CA", "key": { "algo": "rsa", "size": 4096 }, "names": [ { "C": "US", "L": "Austin", "O": "Access Testing", "OU": "TX", "ST": "Texas" } ]}config. Create a file named ca-config.json and add the following JSON blob, then save the file.
{ "signing": { "default": { "expiry": "8760h" }, "profiles": { "server": { "usages": ["signing", "key encipherment", "server auth"], "expiry": "8760h" }, "client": { "usages": ["signing", "key encipherment", "client auth"], "expiry": "8760h" } } }}Now, run the following command to generate the root CA with those files.
cfssl gencert -initca ca-csr.json | cfssljson -bare caThe command will output a root certificate (ca.pem) and its key (ca-key.pem).
lsca-config.json ca-csr.json ca-key.pem ca.csr ca.pemUpload the contents of ca.pem to Cloudflare Access. For instructions, refer to Add mTLS to your Access application.
To generate a client certificate that will authenticate against the uploaded root CA:
Create a file named client-csr.json and add the following JSON blob:
{ "CN": "James Royal", "hosts": [""], "key": { "algo": "rsa", "size": 4096 }, "names": [ { "C": "US", "L": "Austin", "O": "Access", "OU": "Access Admins", "ST": "Texas" } ]}Now, use the following command to generate a client certificate with the Cloudflare PKI toolkit:
cfssl gencert -ca=ca.pem -ca-key=ca-key.pem -config=ca-config.json -profile=client client-csr.json | cfssljson -bare clientThe command will output a client certificate file (client.pem) and its key (client-key.pem). You can now use these files to test mTLS.
You can use the Cloudflare PKI toolkit to generate a certificate revocation list (CRL), as well. This list will contain client certificates that are revoked.
Get the serial number from the client certificate generated earlier. Add that serial number, or any others you intend to revoke, in hex format in a text file. This example uses a file named serials.txt.
Create the CRL with the following command.
cfssl gencrl serials.txt ../mtls-test/ca.pem ../mtls-test/ca-key.pem | base64 -D > ca.crlYou will need to add the CRL to your server or enforce the revocation in a Cloudflare Worker. An example Worker Script can be found on the Cloudflare GitHub repository ↗.
In addition to enforcing mTLS authentication for your host, you can also forward a client certificate to your origin server as an HTTP header. This setup is often helpful for server logging.
To avoid adding the certificate to every single request, the certificate is only forwarded on the first request of an mTLS connection.
The most common approach to forwarding a certificate is to use the Cloudflare API to update an mTLS certificate's hostname settings.
Required API token permissions
Access: Mutual TLS Certificates Writecurl "https://api.cloudflare.com/client/v4/zones/$ZONE_ID/access/certificates/settings" \ --request PUT \ --header "X-Auth-Email: $CLOUDFLARE_EMAIL" \ --header "X-Auth-Key: $CLOUDFLARE_API_KEY" \ --json '{ "settings": [ { "hostname": "<HOSTNAME>", "china_network": false, "client_certificate_forwarding": true } ] }'Once client_certificate_forwarding is set to true, every request within an mTLS connection will now include the following headers:
Cf-Client-Cert-Der-Base64Cf-Client-Cert-Sha256You can also modify HTTP response headers using Managed Transforms to pass along TLS client auth headers.
Additionally, Workers can provide details around the client certificate.
const tlsHeaders = { 'X-CERT-ISSUER-DN': request.cf.tlsClientAuth.certIssuerDN, 'X-CERT-SUBJECT-DN': request.cf.tlsClientAuth.certSubjectDN, 'X-CERT-ISSUER-DN-L': request.cf.tlsClientAuth.certIssuerDNLegacy, 'X-CERT-SUBJECT-DN-L': request.cf.tlsClientAuth.certSubjectDNLegacy, 'X-CERT-SERIAL': request.cf.tlsClientAuth.certSerial, 'X-CERT-FINGER': request.cf.tlsClientAuth.certFingerprintSHA1, 'X-CERT-VERIFY': request.cf.tlsClientAuth.certVerify, 'X-CERT-NOTBE': request.cf.tlsClientAuth.certNotBefore, 'X-CERT-NOTAF': request.cf.tlsClientAuth.certNotAfter};mTLS does not currently work for:
You can configure alerts to receive notifications before your mutual TLS certificates expire.
Access mTLS Certificate Expiration Alert
Access customers that use client certificates for mutual TLS authentication. This notification will be sent 30 and 14 days before the expiration of the certificate.
Other options / filtersNone.
Included withPurchase of Access and/or Cloudflare for SaaS.
What should you do if you receive one?Upload a renewed certificate.
Refer to Cloudflare Notifications for more information on how to set up an alert.